Kubernetes is now an industry-wide standard when it comes to all things containers, but when it comes to deploying a database, it can be a bit tricky! However, tasks like adding persistence, ensuring redundancy, and database maintenance can be easily handled with MongoDB Atlas. Fortunately, the MongoDB Atlas Operator gives you the full benefits of using MongoDB Atlas, while still managing everything from within your Kubernetes cluster. In this tutorial, we’ll deploy a MERN stack application in Kubernetes, install the Atlas operator, and connect our back end to Atlas using a Kubernetes secret.
Pre-requisites
You can find the complete source code for this application on Github. It’s a mini travel planner application using MongoDB, Express, React, and Node (MERN). While this tutorial should work for any Kubernetes cluster, we’ll be using Minikube for simplicity and consistency.
Getting started
When it comes to deploying a database on Kubernetes, there’s no simple solution. Apart from persistence and redundancy challenges, you may need to move data to specific geolocated servers to ensure that you comply with GDPR policies. Thus, you’ll need a reliable, scalable, and resilient database once you launch your application into production.
MongoDB Atlas is a full developer data platform that includes the database you love, which takes care of many of the database complexities you’re used to. But, there is a gap between MongoDB Atlas and your Kubernetes cluster. Let’s take a look at the MongoDB Atlas Operator by deploying the example MERN application with a back end and front end.
This application uses a three-tier application architecture, which will have the following layout within our Kubernetes cluster:
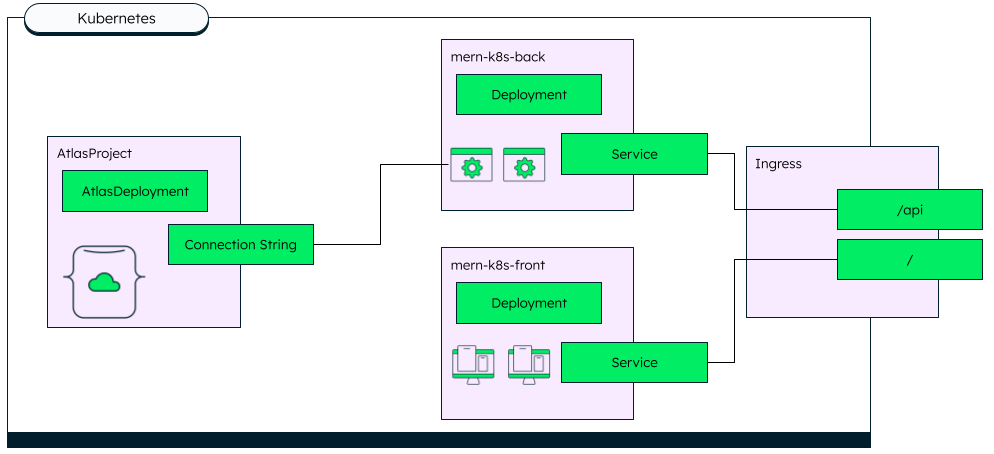
To briefly overview this layout, we’ve got a back end with a deployment that will ensure we have two pods running at any given time, and the same applies for our front end. Traffic is redirected and configured by our ingress, meaning /api requests route to our back end and everything else will go to the front end. The back end of our application is responsible for the connection to the database, where we’re using MongoDB Atlas Operator to link to an Atlas instance.
Deploying the application on Kubernetes
To simplify the installation process of the application, we can use a single kubectl command to deploy our demo application on Kubernetes. The single file we’ll use includes all of the deployments and services for the back end and front end of our application, and uses containers created with the Dockerfiles in the folder.
First, start by cloning the repository that contains the starting source code.
git clone https://github.com/mongodb-developer/mern-k8s.git

cd mern-k8s
Secondly, as part of this tutorial, you’ll need to run minikube tunnel to access our services at localhost.
minikube tunnel
Now, let’s go ahead and deploy everything in our Kubernetes cluster by applying the following application.yaml file.
kubectl apply -f k8s/application.yaml
You can take a look at what you now have running in your cluster by using the kubectl get command.
kubectl get all
You should see multiple pods, services, and deployments for the back end and front end, as well as replicasets. At the moment, they are more likely in a ContainerCreating status. This is because Kubernetes needs to pull the images to its local registry. As soon as the images are ready, the pods will start.
To see the application in action, simply head to localhost in your web browser, and the application should be live!

However, you’ll notice there’s no way to add entries to our application, and this is because we haven’t provided a connection string yet for the back end to connect to a MongoDB instance. For example, if we happen to check the logs for one of the recently created backend pods, we can see that there’s a placeholder for a connection string.
kubectl logs pod/mern-k8s-back-d566cc88f-hhghl

Connecting to database using $ATLAS_CONNECTION_STRING
Server started on port 3000
MongoParseError: Invalid scheme, expected connection string to start with "mongodb://" or "mongodb+srv://"
We’ve ran into a slight issue, as this demo application is using a placeholder ($ATLAS_CONNECTION_STRING) for the MongoDB connection string, which needs to be replaced by a valid connection string from our Atlas cluster. This issue can be taken care of with the MongoDB Atlas Operator, which allows you to manage everything from within Kubernetes and gives you the full advantages of using MongoDB Atlas, including generating a connection string as a Kubernetes secret.
Using the MongoDB Atlas Operator for Kubernetes
As there’s currently a gap between your Kubernetes cluster and MongoDB Atlas, let’s use the Atlas Operator to remedy this issue. Through the operator, we’ll be able to manage our Atlas projects and clusters from Kubernetes. Specifically, getting your connection string to fix the error we received previously can be done now through Kubernetes secrets, meaning we won’t need to retrieve it from the Atlas UI or CLI.
Why use the Operator?
The Atlas Operator bridges the gap between Atlas, the MongoDB data platform, and your Kubernetes cluster. By using the operator, you can use kubectl and your familiar tooling to manage and set up your Atlas deployments. Particularly, it allows for most of the Atlas functionality and tooling to be performed without having to leave your Kubernetes cluster. Installing the Atlas operator creates the Custom Resource Definitions that will connect to the MongoDB Atlas servers.
Installing the Atlas Operator
The installation process for the Atlas Operator is as simple as running a kubectl command. All of the source code for the operator can be found on the Github repository.
kubectl apply -f https://raw.githubusercontent.com/mongodb/mongodb-atlas-kubernetes/main/deploy/all-in-one.yaml
This will create new custom resources in your cluster that you can use to create or manage your existing Atlas projects and clusters.
Creating a MongoDB Atlas cluster
If you haven't already, head to the Atlas Registration page to create your free account. This account will let you create a database on a shared server, and you won't even need a credit card to use it.
Set up access
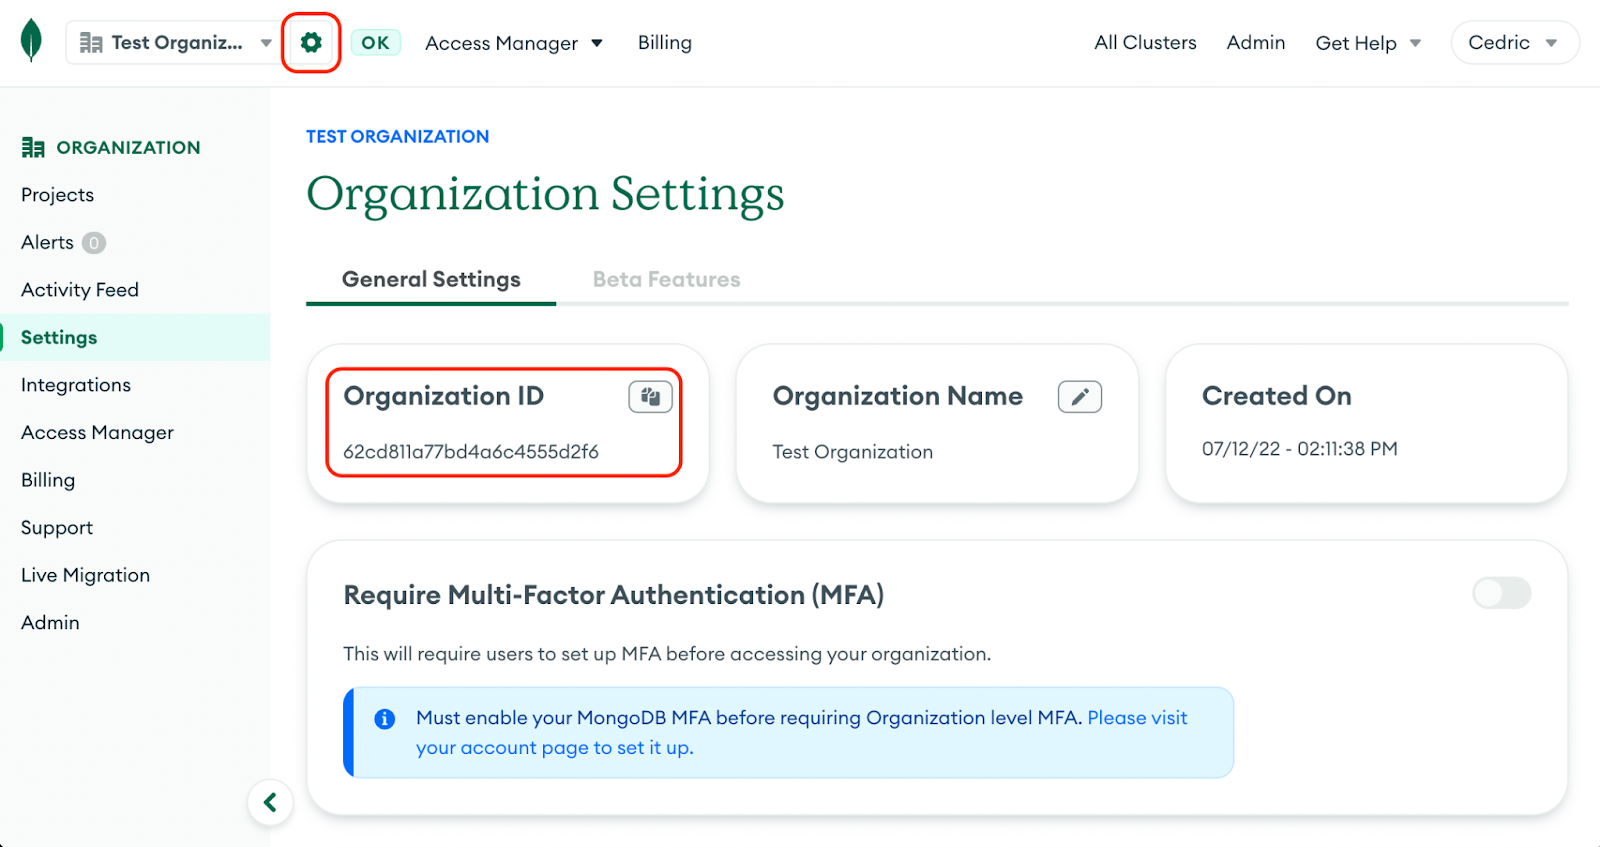
In order for the operator to be able to manage your cluster, you will need to provide it with an API key with the appropriate permissions. Firstly, let’s retrieve the organization ID.
In the upper left part of the Atlas UI, you will see your organization name in a dropdown. Right next to the dropdown is a gear icon. Clicking on this icon will open up a page called Organization Settings. From this page, look for a box labeled Organization ID.
Save that organization ID somewhere for future use. You can also save it in an environment variable.
export ORG_ID=60c102....bd
Note: If using Windows, use:
set ORG_ID=60c102....bd
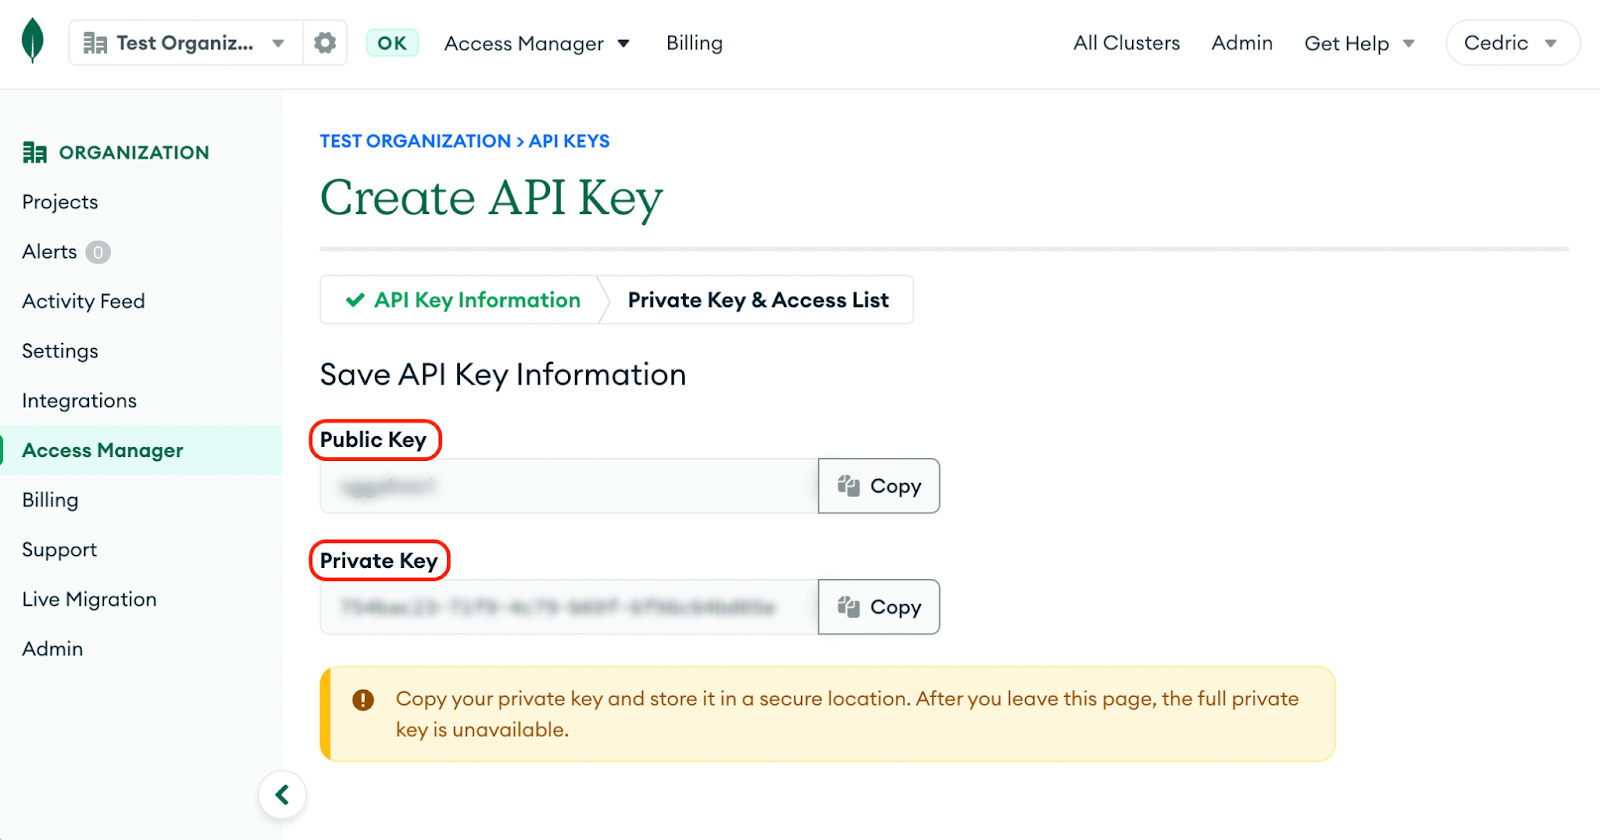
Next, let’s create an API key. From the same screen, look for the Access Manager option in the left navigation menu. This will bring you to the Organization Access screen. In this screen, follow the instructions to create a new API key.

The key will need the Organization Project Creator role in order to create new projects and clusters. If you want to manage existing clusters, you will need to provide it with the Organization Owner role. Save the API private and public keys. You can also add them to the environment.
export ATLAS_PUBLIC_KEY=iwpd...i
export ATLAS_PRIVATE_KEY=e13debfb-4f35-4...cb
Note: If using Windows, use:
set ATLAS_PUBLIC_KEY=iwpd...i
set ATLAS_PRIVATE_KEY=e13debfb-4f35-4...cb
Create the Kubernetes secrets
Now that you have created the API key, you can specify those values to the MongoDB Atlas Operator. By creating this secret in our Kubernetes cluster, this will give the operator the necessary permissions to create and manage projects and clusters for our specific Atlas account.
You can create the secret with kubectl, and to keep it simple, let’s name our secret mongodb-atlas-operator-api-key. For the operator to be able to find this secret, it needs to be within the namespace mongodb-atlas-system.
kubectl create secret generic mongodb-atlas-operator-api-key \
    --from-literal="orgId=$ORG_ID" \
    --from-literal="publicApiKey=$ATLAS_PUBLIC_KEY" \
    --from-literal="privateApiKey=$ATLAS_PRIVATE_KEY" \
    -n mongodb-atlas-system
Next, we’ll need to label this secret, which helps the Atlas operator in finding the credentials.
kubectl label secret mongodb-atlas-operator-api-key atlas.mongodb.com/type=credentials -n mongodb-atlas-system
Create a user password
We’ll need a password for our database user in order to access our databases, create new databases, etc. However, you won't want to hard code this password into your yaml files. It’s safer to save it as a Kubernetes secret. Just like the API key, this secret will need to be labeled too.
kubectl create secret generic atlaspassword --from-literal="password=mernk8s"
kubectl label secret atlaspassword atlas.mongodb.com/type=credentials
Create and manage an Atlas deployment
Congrats! You are now ready to manage your Atlas projects and deployments from Kubernetes. This can be done with the three new CRDs that were added to your cluster. Those CRDs are AtlasProject to manage projects, AtlasDeployment to manage deployments, and AtlasDatabaseUser to manage database users within MongoDB Atlas.
- Projects: Allows you to isolate different database environments (for instance, development/qa/prod environments) from each other, as well as users/teams.
- Deployments: Instance of MongoDB running on a cloud provider.
- Users: Database users that have access to MongoDB database deployments.
The process of creating a project, user, and deployment is demonstrated below, but feel free to skip down to simply apply these files by using the /atlas folder.
Create a project
Start by creating a new project in which the new cluster will be deployed. In a new file called /operator/project.yaml, add the following:
apiVersion: atlas.mongodb.com/v1
kind: AtlasProject
metadata:
  name: mern-k8s-project
spec:
  name: "MERN K8s"
  projectIpAccessList:
    - ipAddress: "0.0.0.0/0"
      comment: "Allowing access to database from everywhere (only for Demo!)"
This will create a new project called "MERN K8s" in Atlas. Now, this project will be open to anyone on the web. It’s best practice to only open it to known IP addresses as mentioned in the comment.
Create a new database user
Now, in order for your application to connect to this database, you will need a database user. To create this user, open a new file called /operator/user.yaml, and add the following:
apiVersion: atlas.mongodb.com/v1
kind: AtlasDatabaseUser
metadata:
  name: atlas-user
spec:
  roles:
    - roleName: "readWriteAnyDatabase"
      databaseName: "admin"
  projectRef:
    name: mern-k8s-project
  username: mernk8s
  passwordSecretRef:
    name: atlaspassword
You can see how the password uses the secret we created earlier, atlaspassword, in the mern-k8s-project namespace.
Create a deployment
Finally, as you have a project setup and user to connect to the database, you can create a new deployment inside this project. In a new file called /operator/deployment.yaml, add the following yaml.
apiVersion: atlas.mongodb.com/v1
kind: AtlasDeployment
metadata:
  name: mern-k8s-cluster
spec:
  projectRef:
    name: mern-k8s-project
  deploymentSpec:
    name: "Cluster0"
    providerSettings:
      instanceSizeName: M0
      providerName: TENANT
      regionName: US_EAST_1
      backingProviderName: AWS
This will create a new M0 (free) deployment on AWS, in the USEAST1 region. Here, we’re referencing the mern-k8s-project in our Kubernetes namespace, and creating a cluster named Cluster0. You can use a similar syntax to deploy in any region on AWS, GCP, or Azure. To create a serverless instance, see the serverless instance example.
Apply the new files
You now have everything ready to create this new project and cluster. You can apply those new files to your cluster using:
kubectl apply -f ./operator
This will take a couple of minutes. You can see the status of the cluster and project creation with kubectl.
kubectl get atlasprojects
kubectl get atlasdeployments
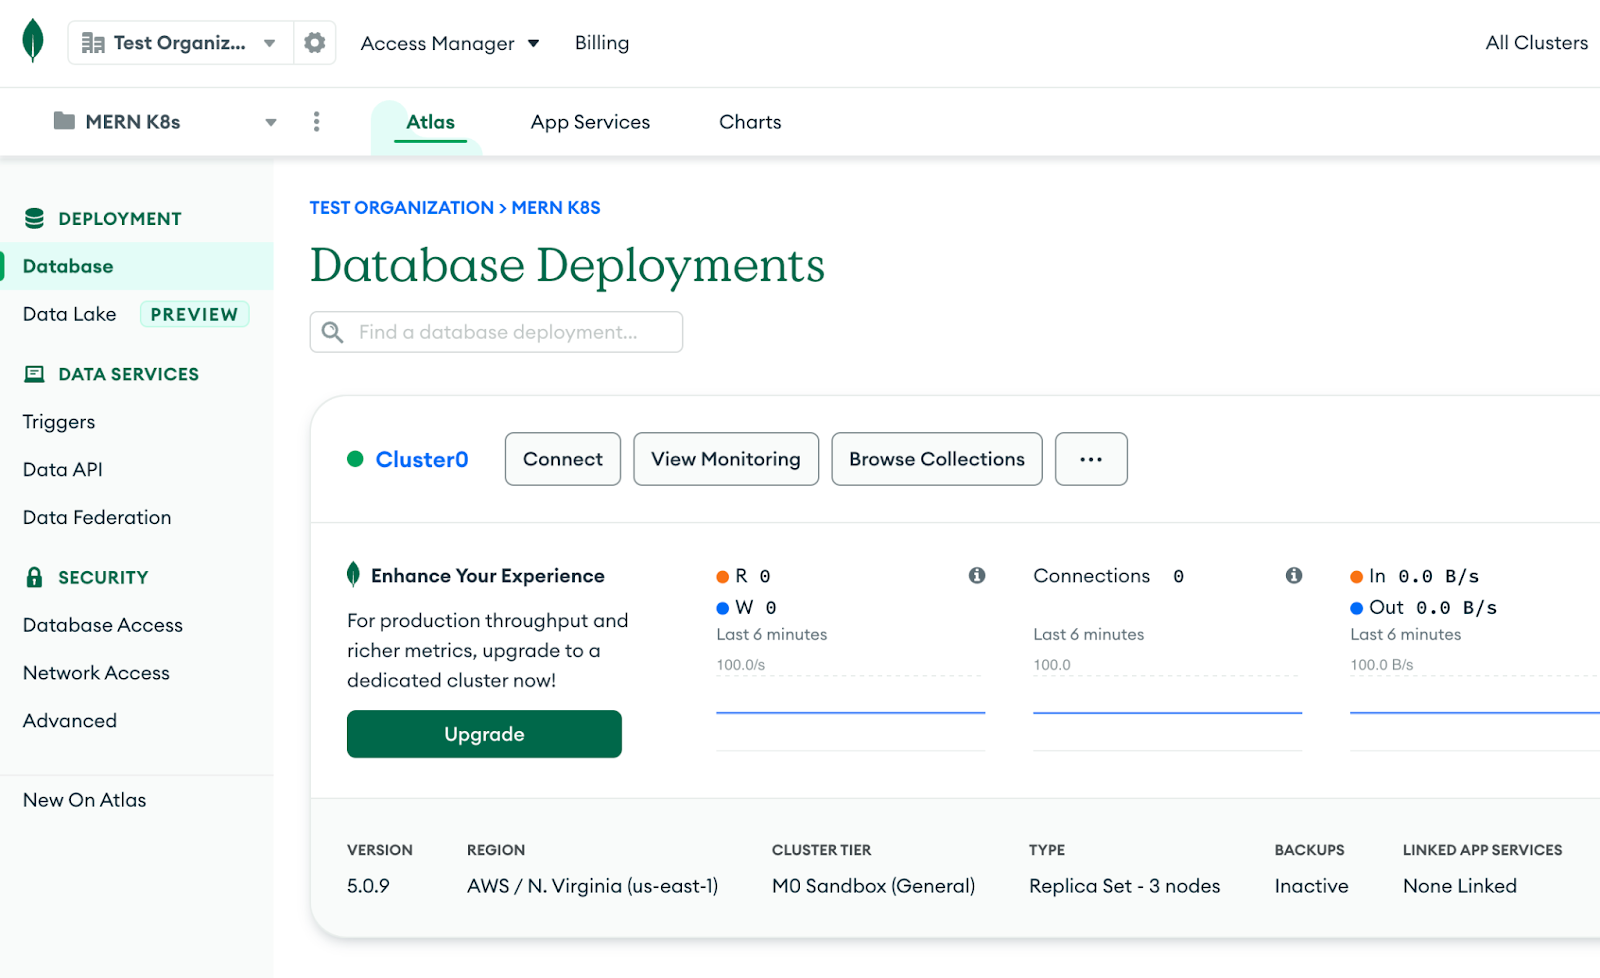
In the meantime, you can go to the Atlas UI. The project should already be created, and you should see that a cluster is in the process of being created.
Get your connection string
Getting your connection string to that newly created database can now be done through Kubernetes. Once your new database has been created, you can use the following command that uses jq to view the connection strings, without using the Atlas UI, by converting to JSON from Base64.
kubectl get secret mern-k8s-cluster0-mernk8s -o json | jq -r '.data | with_entries(.value |= @base64d)'
{
…
"connectionStringStandard": "",
"connectionStringStandardSrv": "mongodb+srv://mernk8s:mernk8s@cluster0.fb4qw.mongodb.net",
"password": "mernk8s",
"username": "mernk8s"
}
Configure the application back end using the Atlas operator
Now that your project and cluster are created, you can access the various properties from your Atlas instance. You can now access the connection string, and even configure your backend service to use that connection string. We’ll go ahead and connect our back end to our database without actually specifying the connection string, instead using the Kubernetes secret we just created.
Update the backend deployment
Now that you can find your connection string from within Kubernetes, you can use that as part of your deployment to specify the connection string to your back end.
In your /k8s/application.yaml file, change the env section of the containers template to the following:
          env:
            - name: PORT
              value: "3000"
            - name: "CONN_STR"
              valueFrom:
                secretKeyRef:
                  name: mern-k8s-cluster0-mernk8s
                  key: connectionStringStandardSrv
This will use the same connection string you've just seen in your terminal.
Since we’ve changed our deployment, you can apply those changes to your cluster using kubectl:
kubectl apply -f k8s/application.yaml
Now, if you take a look at your current pods:
kubectl get pods
You should see that your backend pods have been restarted. You should now be able to test the application with the back end connected to our newly created Atlas cluster. Now, just head to localhost to view the updated application once the deployment has restarted. You’ll see the application fully running, using this newly created cluster.

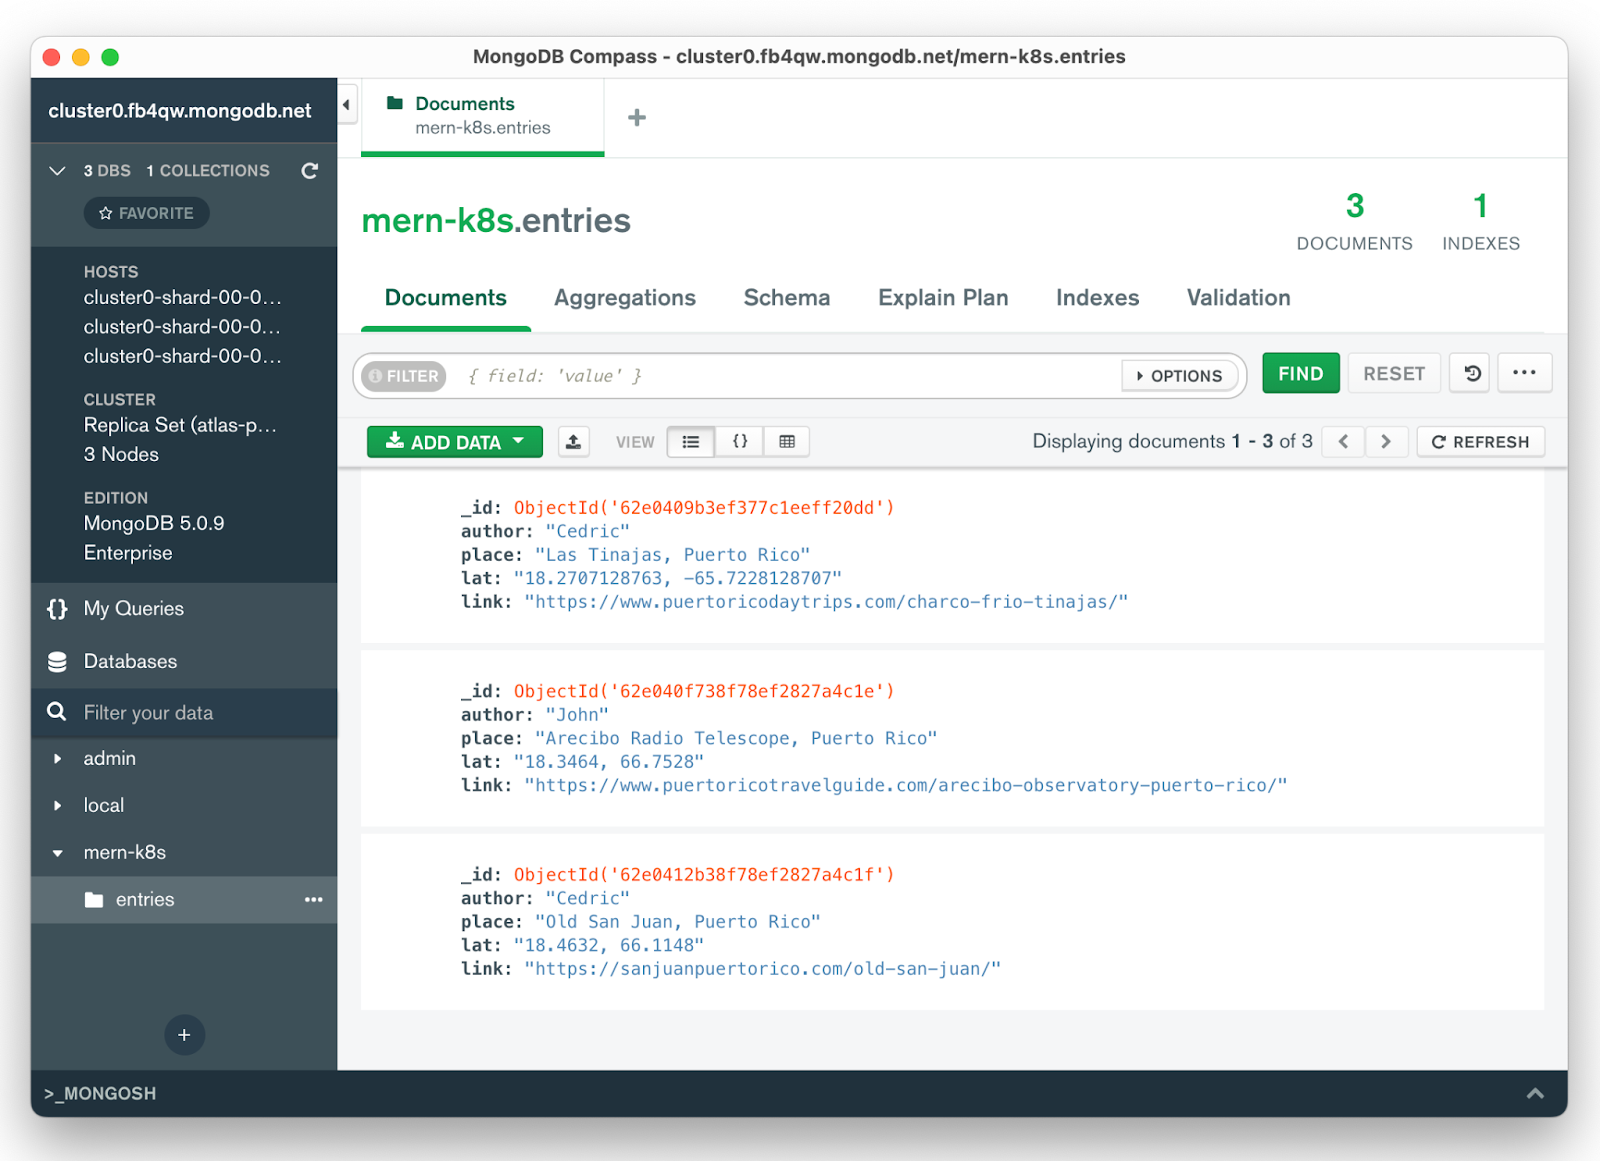
In addition, as you add items or perhaps clear the entries of the travel planner, you’ll notice the entries added and removed from the “Collections” tab of the Cluster0 database within the Atlas UI. Let’s take a look at our database using MongoDB Compass, with username mernk8s and password mernk8s as we set previously.
Delete project
Let’s finish off by using kubectl to delete the Atlas cluster and project and clean up our workspace. We can delete everything from the current namespace by using kubectl delete
kubectl delete atlasdeployment mern-k8s-cluster
kubectl delete atlasproject mern-k8s-project
Summary
You now know how to leverage the MongoDB Atlas Operator to create and manage clusters from Kubernetes. We’ve only demonstrated a small bit of the functionality the operator provides, but feel free to head to the documentation to learn more.
If you are using MongoDB Enterprise instead of Atlas, there is also an Operator available, which works in very similar fashion.
To go through the full lab by Joel Lord, which includes this guide and much more, check out the self-guided Atlas Operator Workshop.